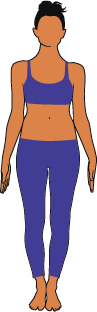
Mountain Pose (Tadasana)
Get ready to doubt your ability to stand! This pose is more involved than you’d think.
(tah-DAHS-anna)
tada = mountain
Yes!
Yes! Eyes are open, body is protected.
Beginner
Pro tip: Picture your energy moving up, feet rooting down
Mountain Pose (Tadasana) Step-by-Step Instructions:
1. Big toe ball mounds touch together, heels slightly apart (feet parallel)
Ask yourself: Why do my big toes need to be together? How does this feel? If it feels uncomfortable, if your knees are collapsing in, or if your hips are wide (hello women!), take your feet broader, even to hips distance. This is especially important when you’re pregnant, as your center of gravity changes and your balance is off.
2. Ground through all sides of the feet, lift inner ankles to inner thighs, hug outer ankles in
Play with swaying side-to-side to feel the weight on all 4 corners of your feet, then slowly come to stillness with your weight evenly distributed.
3. Engage legs, lift knee caps and quads without hardening your belly or locking your knees
Allow yourself to feel all the confusion you need, I told you this pose was involved. Basically, think about keeping your legs engaged without locking or tensing. It takes work, trust me.
4. Turn thighs slightly inward as the tailbone lengthens to the floor, pubis lifts toward navel. Pelvis should be neutral.
Engaged Legs, no locking! Tail down, privates up! Really pay attention to “pelvis neutral.” Depending on your body, you may already be tucking or titling your hips and the amount you need to do in this step will differ. Place your hands on your hips to help find a neutral pelvis.
5. Roll the shoulders back and down, then widen them across and release them down your back
It takes a long time to be able to feel your shoulder blades widening. Begin to tune in to the area but don’t stress too much if you don’t get it right away. Your body will speak to you more as you continue to practice listening.
6. Lift the top of your sternum to the ceiling, then soften your front rib cage toward your back
Your ribs are likely to jut out at this point, it’s normal. We’re creating length in our spine and expansion in our upper body while keeping our ribcage neutral. Take a deep breath, maintain that long spine, and relax.
7. Open across the collarbones, arms hang by sides
Proud chest! Long Spine! No Lock! Breathe. I actually learned this pose with the palms forward, arms in external rotation. Apparently that’s a modification of this pose, feel free to try it out and consider the useful applications!
8. Lengthen through the crown of the head, chin parallel to the floor, gaze forward, throat soft, jaw relaxed
Everything is stacked, face relaxed, standing on my mat, how ‘bout dat? (I’m sorry, lol)
9. Breathe
Experience the pose, and allow yourself to feel all the despair you need upon realizing this “simple pose” is anything but
Contraindications:
If disabled, may possibly be done sitting.
Benefits:
- Teaches you how to stand with proper posture
- Creates a sense of stability
- Reveals postural imbalances
- Relieves sciatica
- Reduces flat feet
- Strengthens thighs, knees and ankles
Modifications, Variations & Props:
- Feet hip distance apart and parallel for more stability (pregnant, beginner, elder, wide hips, just because it feels better)
- Block between thighs to teach the internal rotation, leg support & connection to the pelvic floor and core
- Standing with the wall against the back body. Generally, the backs of your heels, sacrum and shoulder blades (not your head) should touch the wall. Your body may be different, that’s ok! (I’m looking at you, big butts, and no I’m not bitter)
With a Partner:
When in doubt: ask a friend to check you out! Let them look at you from all angles to make sure your head is stacked over your heels, your ribcage isn’t poking out, and your knees aren’t locked.
Go Deeper:
Try closing your eyes while maintaining your balance and alignment. You might be surprised how challenging standing on two feet can be without environmental cues. This is a great way to practice for Vrksasana.
Common Mistakes:
- Ribs moving forward
- Collapsed Energy
- Feet too narrow for proper balance
- Locked Knees
- Clenching (booty, jaw, soul)
What’s next?
”One thousand things that apply to Tadasana apply to every other pose.” – B.K.Iyengar
Once you master proper alignment in this pose, try it out in all the standing poses!